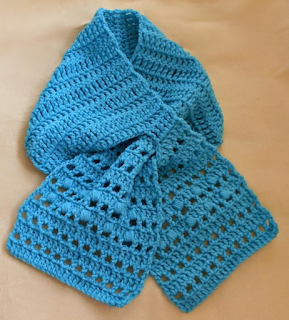
Thursday, May 16, 2013

Marcherie

Best Blog Tips


This scarf reminds me of some flowers who have a center that is bursting with color and then the color fades as it reaches the edges of the petals, turning into a soft blush, a little whisper of color.
This short scarf is ideal for gifts and charity projects because it uses very little yarn and works up really fast. It is also relatively easy.

Skill- Easy
Size- 40 1/2" L x 6" W

Materials- 
Red Heart worsted weight yarn Shocking Pink (about 1/2 skein)
Red Heart worsted weight yarn Baby Pink (about 1/2 skein)
Crochet hook size H
Scissors
Blunt needle

We will start from the edges up.
Lace Edges (Make 2)-
With Baby Pink and H hook, ch 24.

Row 1- 1 sc in 4th ch from hook (counts as first picot), ch 1, skip 1 ch, 1 sc in next ch, * ch 4, work 1 sc in 4th ch from hook (counts as a picot), ch 1, skip 2 ch, 1 sc in next ch; rep across from *. Ch 5, turn.
Row 2- 1 sc in 4th ch from hook, ch 1, 1 sc in center of next picot, *ch 4, 1 sc in 4th ch from hook, ch 1, 1 sc in center of next picot; rep from * across. Ch 5, turn.
Rows 3 to 6- Rep row 2. Ch 5, turn.
Row 7- Rep row 7. Fasten off Baby Pink, weave in ends.
Left Side of Short Scarf-
Note- Ch 3 counts as first dc, and ch 4 counts as first tr of row.
Join Shocking Pink to the foundation of first Lace Edge.
Row 1- Work 20 sc across. (20 sc) Ch 3, turn.
Row 2- 1 dc in each sc across. (20 dc) Ch 4, turn.
Row 3- 1 tr in each dc across. (20 tr)Ch 3, turn.
Rows 4 to 8- Alternate 1 dc row and 1 tr row, ending with a dc row. (20 sts) Ch 4, turn.
Row 9- 1 tr in each of next 4 dc, Ch 10, skip 10 sts, 1 tr in each of last 5 dc. (20 sts) (Keyhole started) Ch 3, turn.
Row 10 1 dc in each tr and in each ch across. (20 dc) (keyhole completed) Ch 4, turn.
Rows 11 to 21- Alternate 1 tr and 1 dc row, ending with 1 tr row. Ch 3, turn. (20 sts)
Row 22- 1 dc in each tr across. (20 dc) Fasten off Shocking Pink, weave in tails.


Right Side of Short Scarf-
Join Shocking Pink to the foundation of first Lace Edge.
Row 1- Work 20 sc across. (20 sc) Ch 3, turn.
Row 2- 1 dc in each sc across. (20 dc) Ch 4, turn.
Row 3- 1 tr in each dc across. (20 tr)Ch 3, turn.
Rows 4 to 8- Alternate 1 dc row and 1 tr row, ending with a dc row. (20 sts) Ch 4, turn.
Row 9- 1 tr in each dc across. (20 tr) Ch 3, turn.
Row 10- 1 dc in each tr across. (20 dc) Ch 4, turn.
Rows 11 to 21- Alternate 1 tr and 1 dc row, ending with 1 tr row. Ch 3, turn. (20 sts)
Row 22- 1 dc in each tr across. (20 dc) Fasten off Shocking Pink, leaving long tail to sew with.
Place both pieces together, right sides facing, and sew. Weave in ends.

Done!

Best Blog Tips

Sunday, April 28, 2013

Lauren

Best Blog Tips

You can never have enough neckwarmers and scarves! If they're easy on the wear, fast to make, pretty and make you feel lovely, all the better! If you crochet for charity, Lauren is also a wonderful addition to your collection of patterns, since the pattern is extremely easy and quick to make. If you are already planning and putting together a collection of patterns you will tackle for the Holidays, this one has to be in it, because you;ll make it in a jiffy, almost with your eyes closed!

Skill- Easy
Size- 33 1/2" L x 5" W
Materials-
Red Heart worsted weight yarn Dark Orchid (1/2 skein)
Eed Heart worsted weight yarn Orchid (1/2 skein)
Crochet hook size H
Scissors

Body of Scarflet-
With H hook and Dark Orchid, ch 68.
Row 1- 1 dc in 4th ch from hook and in each ch across. (65, counting the first 3 ch as first dc of row) Ch 4, turn.
Row 2- 1 tr in each dc across. (65 tr) Ch 3, turn.
Row 3- 1 dc in each tr across. (65 dc) Ch 4, turn.
Rows 4 to 6- Alternate 1 dc row and 1 tr row, ending with a tr row. Ch 3, turn.
Row 7- 1 dc in each tr across.
Decorative Edges 
Left Side-
Row 1- Working on narrow edge of scarflet, make 18 sc across. (18 sc) Ch 3, turn (counts as first dc of next row).
Row 2- 1 dc in each sc across. (18 dc) Ch 4, turn (counts as first tr of next row)
Row 3- 1 tr in each of next 3 dc, ch 10 and skip 10 dc, 1 tr in each of last 4 dc. (Keyhole started) Ch 3, turn.
Row 4- 1 dc in each tr and in each tr across. (18 dc) (Keyhole completed.) Fasten off Dark Orchid, weave in tail.


Lace-
Row 5- Join Orchid. Work 1 sc ine ach sc across. (18 sc) Ch 3, turn (counts as 1 dc of next row of lace throughout)
Row 6- 1 dc in next sc, skip 2 sc, 1 dc, ch 1, 1 dc, ch 1, 1 dc, ch 1, 1 dc in next sc, (Shell made) skip 2 sc, 1 dc in each of next 3 sc, skip 2 sc, work Shell in next sc, skip 3 sc, 1 dc in each of last 2 sc. Ch 3, turn.
Row 7- 1 dc in next dc, work Shell in center ch-1 sp of first Shell, 1 dc in each of next 3 dc, work Shell in center ch-1 sp of next shell, 1 dc in each of last 2 dc. Ch 3, turn.
Rows 8 to 12- Rep row 7. Fasten off Orchid, weave in tail.
Decorative Edges 
Right Side-
Row 1- Working on narrow edge of scarflet, make 18 sc across. (18 sc) Ch 3, turn (counts as first dc of next row).
Row 2- 1 dc in each sc across. (18 dc) Ch 4, turn (counts as first tr of next row)
Row 3- 1 tr in each dc across. (18 tr) Ch 3, turn.
Row 4- 1 dc in each tr across. (18 dc) Fasten off Dark Orchid, weave in tail.
Lace-
Rows 5 to 12- Join Orchid and repeat the lace that you made for the Left Side of the scarflet.
Fasten off, weave in tails.


Very inspirational:
Do You Feel You Have Fallen Into a Hole and Can't Get Out?


Best Blog Tips

Thursday, April 11, 2013

Janessa Faux Knitted Blocks Short Scarf

Best Blog Tips

A while back, I made a couple of tutorials on how to knit with a crochet hook and a knitting needle, to be able to use the great variety of available knitting stitches. I have noticed that those tutorials have interested a lot of you, so here is an actual project with blocks made in knitting stitches combined with crochet which you can make after you have practiced knitting with a crochet hook and a knitting needle.

Size- Approx. 44" L x 7" W

More than a pattern, this is an idea that you can tailor to your own personal taste.

Materials-
To begin with, choose three colors that either contrast beautifully or are in harmony together. I chose two shades of blue and red (Red Heart worsted weight yarn Soft Navy, Delft Blue and Hot Red, and you would need about ½ skein of each for this).
Crochet hook size H
Scissors
Blunt needle to weave in ends
1 pair knitting needles size 5 (you will only be using 1 of them)
1” button
Sewing needle
Sewing thread the color of button

How to make the blocks:
With chosen yarn, and leaving a little tail at the beginning, ch 19.
Insert hook in first ch and pull up a loop, insert that loop into a knitting needle and repeat, until you have “hung” all your chains into the knitting needle. This is your casting on process.
Now, to make the knitting stitch:
Please refer to these 2 tutorials to learn how to do this stitch:

http://craftybegonia.blogspot.com/2011/05/how-to-crochet-with-knitting-needles.html 

http://craftybegonia.blogspot.com/2011/05/how-to-crochet-with-knitting-needles_09.html

Row 1- Do the knit stitch in every loop on the knitting needle. Turn.
Row 2- Do the Purl stitch in every loop on the knitting needle. Turn.
Continue this way until you have completed 21 rows. Fasten off, weave in all tails.

You need a total of 6 blocks, 3 of each main color.


Once you have made two blocks, you can start joining them right away, even as you continue to make your scarf. To join the blocks, proceed as follows:
Beginning Block-
Row 1- With Delft Blue (or contrasting color of choice,) insert hook into a corner of your first block and pull up loop, work 1 sc in that block and make 1 sc in each stitch across, and then sc all around the block in the same way.
Row 2- ch 3, skip 2 sc, 1 sc in next sc, *ch 3, skip 2 sc, 1 sc in next sc, rep from * around.
Second Block (in contrasting color, in my case, it was Hot Red)-
Row 1- Join Delft Blue (or contrasting yarn of choice) and sc all around.
Row 2- Ch 1, insert the hook into the first loop of Beginning Block, and ch 2, 1 sc in next sc, rep across, until you have completed a series of loops inside the row of loops you had previously made across the joining side of the Beginning Block. You will be repeating this form of joining for every other Block.

Once you have finished and joined 4 blocks, alternating the 2 main colors, you will reach the point in which you need to make a buttonhole.
Buttonhole Strip-
On Left Side of Forming Scarflet, join Delft Blue (or contrasting yarn of your choice):
(Because we want this strip to be as flexible as the blocks, we will be used a stitch that some call the Sweater Stitch)
Row 1- 3 sc in first loop of previous loop row, 1 sc in next sc, *3 sc in next loop, 2 sc in next sc, rep from * across.
Row 2- 1 sc, ch 1, skip 1 sc, 1 sc in next sc, *ch 1, skip 1 sc, 1 sc in next sc, rep across.
Row 3- Ch 1, skip first sc, 1 sc in next ch 1, ch 1, *skip next sc, 1 sc in next ch 1, ch 1, rep from * across.
Row 4- Ch 1, skip first sc, 1 sc in next ch 1, ch 1, *skip next sc, 1 sc in next ch 1, ch 1, rep from * across.
Row 5- Ch 1, skip first sc, 1 sc in next ch 1, ch 1, *skip next sc, 1 sc in next ch 1, ch 1, rep from *  till you reach the middle of the row, then ch 3, skip 3 stitches and continue the stitch as before until you finish the row.
Row 6- Ch 1, skip first sc, 1 sc in next ch 1, ch 1, *skip next sc, 1 sc in next ch 1, ch 1, rep from * until you reach the buttonhole chains, 3 sc in buttonhole, and continue the row as before, Ch 1, skip first sc, 1 sc in next ch 1, ch 1, *skip next sc, 1 sc in next ch 1, ch 1, rep from * across.
Row 7- Work the connecting loop row and you have been doing with all the Bocks. Fasten off, weave in tails.

Make another Block, then work the contrasting color sc row and start the loops row, when you reach the bottom of the Block, begin to connect the loops to the end of the Buttonhole Strip, ch 1, insert hook into the first loop, ch 2, and then make an sc in next stitch of Strip, continue working like that until you complete the row. Fasten off, weave in tail.

Turn the piece around and join Delft Blue to the opposite side of it.
Button Strip-
Row 1- 3 sc in first loop of previous loop row, 1 sc in next sc, *3 sc in next loop, 2 sc in next sc, rep from * across.
Row 2- 1 sc, ch 1, skip 1 sc, 1 sc in next sc, *ch 1, skip 1 sc, 1 sc in next sc, rep across.
Row 3- Ch 1, skip first sc, 1 sc in next ch 1, ch 1, *skip next sc, 1 sc in next ch 1, ch 1, rep from * across.
Row 4- Ch 1, skip first sc, 1 sc in next ch 1, ch 1, *skip next sc, 1 sc in next ch 1, ch 1, rep from * across.
Row 5- Ch 1, skip first sc, 1 sc in next ch 1, ch 1, *skip next sc, 1 sc in next ch 1, ch 1, rep from * across.
Row 6- Ch 1, skip first sc, 1 sc in next ch 1, ch 1, *skip next sc, 1 sc in next ch 1, ch 1, rep from * across.
Row 7- Work the connecting loop row and you have been doing with all the Blocks. Fasten off, weave in tails.

Make another Block, then work the contrasting color sc row and start the loops row, when you reach the bottom of the Block, begin to connect the loops to the end of the Button Strip, ch 1, insert hook into the first loop, ch 2, and then make an sc in next stitch of Strip, continue working like that until you complete the row. Fasten off, weave in tail.

Loopy Edging-
Join Delft Blue to first chain of first loop of First Block, ch 30, sl st in same ch, sl st in next ch, sl st in next ch, ch 30, sl st in same ch, * sl st in same ch, sl st in next ch, sl st in next ch, ch 30, sl st in same ch, rep from * across. Fasten off, weave in tails.
Repeat Loopy Edging on the opposite side of scarflet. Fasten off, weave in tails.

Thread sewing needle and sew button to correspond with buttonhole. Fasten off.
Done!


Best Blog Tips

Sunday, March 31, 2013

Chrislynn

Best Blog Tips


Many of you have expressed that you prefer keyhole scarflets. I do too! They stay put once you close them around your neck, they do not have an uncomfortable knot and they don't have to be so long that you seem to drag them around, sticking them where you don't want them. They can also be made in a jiffy, which is always a plus. This pattern is freely shared for personal and charity use. Enjoy!

Skill- Moderate easy
Size- 43" L x 7" W

Materials-
Red Heart worsted weight yarn Burgundy (1 skein)
Crochet hook size H

Right side of scarflet.
Lace-
With Burgundy and H hook, Ch 24
Row 1- 1 dc in 4th ch from hook and in each ch across. Ch 3, turn. (22 dc)
Row 2- 1 dc in next dc, ch 1, skip 1 dc, 1 dc in next dc, ch 1, skip 1 dc, 1 dc in next dc, ch 4, skip 4 dc, 1 dc in each of next 2 dc, ch 4, skip 4 dc,
1 dc in next dc, ch 1, skip 1 dc, 1 dc in next dc, ch 1, 1 dc in each of last 2 dc. Ch 3, turn.
Row 3- 1 dc in next dc, ch 1, 1 dc in next dc, ch 1, 1 dc in next dc, ch 4, 1 sc in each of next 2 dc, ch 4, 1 dc in next dc, ch 1, 1 dc in next dc, ch 1, 1 dc in each of last 2 dc. Ch 3, turn.
Rows 4 to 6- Rep row 3. Ch 3, turn.
Row 7- 1 dc in next dc, ch 1, skip 1 dc, 1 dc in next dc, ch 1, skip 1 dc, 1 dc in next dc, ch 4, 1 dc in each of next 2 sc, ch 4, 1 dc in next dc, ch 1, 1 dc in next dc, ch 1, 1 dc in each of last 2 dc. Ch 3, turn.
Row 8- 1 dc in next dc, ch 1, 1 dc in next dc, ch 1, 1 dc in next dc, [ch 1, skip 1 ch, 1 dc in next ch,] rep twice, ch 1, skip next dc, 1 dc in space in between next 2 dc, ch 1, skip next dc, ch 1, 1 dc in next ch,
ch 1, skip next ch, 1 dc in next ch, ch 1, skip next ch, 1 dc in next dc, ch 1, 1 dc in next dc, ch 1, 1 dc in each of last 2 dc. Ch 3, turn.
Row 9- 1 dc in next dc, ch 1, 1 dc in next dc, ch 1, 1 dc in next dc, ch 1, rep across, till you reach last 2 sts, 1 dc in each of those 2 sts. Ch 3, turn.
Rows 10 to 11- Rep row 9. Ch 3, turn.
Row 12- 1 dc in each ch and in each dc across. (23 dc) Ch 3, turn.
Row 13- 1 dc in each of next 4 dc, skip 2 dc, 2 dc, ch 1, 2 dc in next dc, skip 2 dc, 1 dc in each of next 3 dc, skip 2 dc, 2 dc, ch 1, 2 dc in next dc, skip 2 dc, 1 dc in each of last 5 dc. Ch 3, turn.
Row 14- 1 dc in each of next 3 dc, skip next dc, skip first dc of next shell, 1 dc in next dc of shell, ch 1, 1 dc, ch 1, 1 dc in center ch-1 sp of shell, 1 dc in next dc of shell, skip last dc of shell, skip next dc, 2 dc in next dc, skip next dc,
skip first dc of next shell, 1 dc, ch 1, 1 dc in center ch-1 sp of shell, 1 dc in next dc of shell, skip last dc of shell, skip next dc, 1 dc in each of last 4 dc. Ch 3, turn.
Row 15- 1 dc in each of next 3 dc, skip all the way to center ch-1 sp of first shell, work 2 dc, ch 1, 2 dc in that space, 1 dc in next dc, 2 dc in next dc, skip all the way to center ch-1 sp of next shell, make 2 dc, ch 1, 2 dc in that space, 1 dc in each of last 4 dc. Ch 3, turn.
Row 16- Rep row 14. Ch 3, turn.
Row 17- 2 dc in same spot of ch 3, ch 1, skip to center of next shell, work 5 dc in that spot, ch 1, 1 sc in each of next 2 dc, ch 1, 5 dc in center of next shell, ch 1, skip all the way to las st of row, work 3 dc in that st. Fasten off, weave in tail.


Body of Scarflet-
Row 1- Join Burgundy to first dc of what was originally the first row of dc. Work 1 tr in each dc across. (22 tr) Ch 3, turn.
Row 2- 1 dc in each tr across. (22 dc) Ch 4, turn.
Row 3- 1 tr in each dc across. (22 tr) Ch 3, turn.
Row 4- 1 dc in each tr across. (22 dc) Ch 4, turn.
Row 5- 1 tr in each dc across. (22 tr) Ch 3, turn.
Rows 6 to 15- Alternate 1 dc row and 1 tr row, ending with 1 dc row. Fasten off, leaving long tail to sew with.
Left Side of Scarflet.
Lace-
Row 1- 1 dc in 4th ch from hook and in each ch across. Ch 3, turn. (22 dc)
Row 2- 1 dc in next dc, ch 1, skip 1 dc, 1 dc in next dc, ch 1, skip 1 dc, 1 dc in next dc, ch 4, skip 4 dc, 1 dc in each of next 2 dc, ch 4, skip 4 dc,
1 dc in next dc, ch 1, skip 1 dc, 1 dc in next dc, ch 1, 1 dc in each of last 2 dc. Ch 3, turn.
Row 3- 1 dc in next dc, ch 1, 1 dc in next dc, ch 1, 1 dc in next dc, ch 4, 1 sc in each of next 2 dc, ch 4, 1 dc in next dc, ch 1, 1 dc in next dc, ch 1, 1 dc in each of last 2 dc. Ch 3, turn.
Rows 4 to 6- Rep row 3. Ch 3, turn.
Row 7- 1 dc in next dc, ch 1, 1 dc in next dc, ch 1, 1 dc in next dc, ch 4, 1 dc in each of next 2 sc, ch 4, 1 dc in next dc, ch 1, 1 dc in next dc, ch 1, 1 dc in each of last 2 dc. Ch 3, turn.
Row 8- 1 dc in next dc, ch 1, 1 dc in next dc, ch 1, 1 dc in next dc, [ch 1, skip 1 ch, 1 dc in next ch,] rep twice, ch 1, skip next dc, 1 dc in space in between next 2 dc, ch 1, skip next dc, ch 1, 1 dc in next ch,
ch 1, skip next ch, 1 dc in next ch, ch 1, skip next ch, 1 dc in next dc, ch 1, 1 dc in next dc, ch 1, 1 dc in each of last 2 dc. Ch 3, turn.
Row 9- 1 dc in next dc, ch 1, 1 dc in next dc, ch 1, 1 dc in next dc, ch 1, rep across, till you reach last 2 sts, 1 dc in each of those 2 sts. Ch 3, turn.
Rows 10 to 11- Rep row 9. Ch 3, turn.
Row 12- 1 dc in each ch and in each dc across. (23 dc) Ch 3, turn.
Row 13- 1 dc in each of next 4 dc, skip 2 dc, 2 dc, ch 1, 2 dc in next dc, skip 2 dc, 1 dc in each of next 3 dc, skip 2 dc, 2 dc, ch 1, 2 dc in next dc, skip 2 dc, 1 dc in each of last 5 dc. Ch 3, turn.
Row 14- 1 dc in each of next 3 dc, skip next dc, skip first dc of next shell, 1 dc in next dc of shell, ch 1, 1 dc, ch 1, 1 dc in center ch-1 sp of shell, 1 dc in next dc of shell, skip last dc of shell, skip next dc, 2 dc in next dc, skip next dc,
skip first dc of next shell, 1 dc, ch 1, 1 dc in center ch-1 sp of shell, 1 dc in next dc of shell, skip last dc of shell, skip next dc, 1 dc in each of last 4 dc. Ch 3, turn.
Row 15- 1 dc in each of next 3 dc, skip all the way to center ch-1 sp of first shell, work 2 dc, ch 1, 2 dc in that space, 1 dc in next dc, 2 dc in next dc, skip all the way to center ch-1 sp of next shell, make 2 dc, ch 1, 2 dc in that space, 1 dc in each of last 4 dc. Ch 3, turn.
Row 16- Rep row 14. Ch 3, turn.
Row 17- 2 dc in same spot of ch 3, ch 1, skip to center of next shell, work 5 dc in that spot, ch 1, 1 sc in each of next 2 dc, ch 1, 5 dc in center of next shell, ch 1, skip all the way to las st of row, work 3 dc in that st. Fasten off, weave in tail.
Note- Each lace end of this scarflet is treated as a new section, that is why the rows are numbered again 1 to 15. Using the first dc row of the scarflet's Body and then the last dc row of the scarflet's Body as a foundation for the lace, join yarn to the first dc of that row and work the lace as explained in the lace section on each end of the scarflet.
Keyhole and Body of Scarflet-
Row 1- Join Burgundy to first dc of what was originally the last row of dc. Work 1 tr in each dc across. (22 tr) Ch 3, turn.
Row 2- 1 dc in each tr across. (22 dc) Ch 4, turn.
Row 3- 1 tr in each dc across. (22 tr) Ch 3, turn.
Row 4- 1 dc in each tr across. (22 dc) Ch 4, turn.
Row 5- 1 tr in each of first 5 dc, ch 12, skip 12 dc, 1 tr in each of last 5 dc. (keyhole started) (10 tr, 12 ch) Ch 3, turn.
Row 6- 1 dc in each tr and in each ch across. (22 dc) Ch 4, turn. (Keyhole completed)
Row 7- to 15- Alternate 1 dc row and 1 tr row, ending with 1 dc row. Fasten off, weave tail.
Sew together both pieces using the tail you left when you finished the Right Side. Fasten off, weave in tail.

Done!


Best Blog Tips

Tuesday, March 19, 2013

Blue for the Ocean Star Motif

Best Blog Tips


Technically, this is a hexagon, but I love the star shape and choose to call it a star. Of course, you could make this in any color you prefer, but I'm a beach girl and this one reminded me of sea stars and ocean waves!
Materials-
Worsted weight yarn of your choice (I used Red Heart Delft Blue)
Crochet hook size H

Motif-
With Delft Blue and H hook, ch 6, sl st to join ring.
Rnd 1- Ch 5, 1 dc in next ch, *ch 2, 1 dc in next ch, rep from * around, sl st to join rnd.
Rnd 2- Sl st till you reach first ch-2 sp, ch 3, 3 dc in same sp, ch 2, *4 dc in next ch-sp, ch 2, rep from * around. Sl st to join rnd.
Rnd 3- Sl st till you reach the space in between the first 4 dc of 4-dc group, 4 dc, ch 3, 4 dc in that space, *4 dc, ch 3, 4 dc in space in between 4 dc of next 4-dc group, rep from * around. Sl st to join rnd.
Fasten off, weave in tail.


Best Blog Tips

Wednesday, March 13, 2013

Anna Marie's Shopping Card Bag

Best Blog Tips

My Sister has a whole wad of shopping cards which she regularly uses, at the pharmacy, different supermarkets, etc. She wanted to have them all organized and handy but she did not want to have them in her wallet, so she purchased a smaller little wallet with plastic sleeves, to put them into but with use, the sleeves tore and she came to me and asked me to make her a little bag  that she could use to keep her shopping cards all organized and readily available in her purse or bag. I made her this simple but very useful little bag and decided to share it with all of you, just in case it could also be useful to any of you!

Skill- Easy
Size- 4 1/2" W x 3 3/4" L approx.

Materials-
Worsted weight yarn of your choice (I used Red Heart Shocking Pink)
1 button of your choice (3/4" wide)
Sewing thread to match the bag or button
Sewing needle
Blunt needle to sew bag together and to weave in tails
Scissors


Ch 35.
Row 1- 1 sc in third ch from hook and in each ch across. Ch 2, turn.(34 sc, counting the ch bump on the first st)
Row 2- 1 hdc in each sc across. (34 hdc) Ch 2, turn.
Row 3- 1 hdc in each hdc across. (34 hdc) Ch 1, turn.
Row 4- 1 sc in each hdc across. (34 sc) Ch 2, turn.
Rows 5 to 11- Alternate 2 hdc rows and 1 sc row. Fasten off, leaving long tail to sew with.

Working on Wrong Side, thread blunt needle and sew side and bottom of little bag. Fasten off and weave in tail.

Join Yarn to the Back you your little bag, to start Flap.


To get your subscription, please click on the link below:

 Love Craftybegonia? Get us on the go on your Kindle Reader!

►Subscription is less than $1.00 USD! (You can also enjoy it on your Computer or 
iPhone by downloading the Kindle App!)


Flap-
Row 1- Work 15 hdc across Back of bag. Ch 2, turn. (15 hdc)
Row 2- 1 hdc in each hdc across. (15 hdc) Ch 1, turn.
Row 3- 1 sc in each hdc across. (15 sc)
Rows 4 to 7- Continue as before until you complete these 7 rows. (15 sts) Ch 1, turn.
Row 8- Sl st in each of first  6 sts, ch 4, skip 2 sts, sl st in each st till end of row. Ch 1, turn.
Row 9- 1 sc in each st across. (15 sc) Fasten off, weave in tail.

Sew button in Front of Bag. Fasten off, make a knot inside Bag.

Done!


Encouraging Promises!


Best Blog Tips

Wednesday, March 6, 2013

Damielle

Best Blog Tips

We're into chocolate at Funmigurumi and Kids Stuff as we continue the story of the Frogs from the Chocolate Ponds in Funmigurumiland, so I made this cute yet simple scarf in chocolate colors with a straightforward keyhole closure and a slight touch of lace. Enjoy!

Skill- Easy
Size- 40" L x 7 1/4" W


Materials-
Red Heart worsted weight yarn Coffee (1 skein)
Red Heart worsted weight yarn Cafe (1/2 skein)
Scissors
Blunt needle to weave in tails
Crochet hook size H

Body of short scarf-
With Coffee and H hook, ch 27
Row 1- 1 tr in 5th ch from hook and in each ch across. (24 tr) Ch 4, turn.
Row 2- 1 tr in each tr across. (24 tr) Ch 4, turn.
Rows 3 to 20- 1 tr in each tr across. (24 tr) Ch 4, turn.
Row 21- 1 tr in each tr across. (24 tr) Fasten off Coffee, weave in tails.
Left Side-
Row 22- Join Cafe. Work 1 tr in each tr across. (24 tr) Ch 4, turn.
Row 23- 1 tr in each tr across. (24 tr) Ch 4, turn.
Row 24- 1 tr in each of first 5 tr, ch 14, skip 14 tr, 1 tr in each of last 5 tr. (Keyhole started) Ch 4, turn.
Row 25- 1 tr in each tr and in each ch across. (24 tr) (Keyhole completed) Ch 4, turn.
Row 26- 1 tr in each tr across. (24 tr) Ch 3, turn.
Lace Edge-
Row 1- 1 dc in each of next 2 tr, ch 3, skip 2 tr, 1 sc in next tr, ch 3, skip 2 tr, 1 dc in each of next 2 tr, ch 3, skip 2 tr, 1 sc in next tr, ch 3, skip 2 tr, 1 dc in each of
next 2 tr, ch 3, skip 2 tr, 1 sc in next tr, ch 3, skip 2 tr, 2 dc in next tr, 1 dc in last st of row. Ch 3, turn.
Row 2- 1 dc in each of next 2 dc, ch 3, 1 sc in next sc, *ch 3, 1 dc in each of next 2 dc, ch 3, 1 sc in next sc, rep rill last 3 sts of row, 1 dc in each of last 3 dc. Ch 3, turn.
Row 3- 1 dc in each of next 2 dc, ch 1, 1 dc, ch 1, 1 dc (V St) in next sc, ch 1, 1 dc in each of next 2 dc, ch 1, V St in next sc, ch 1, 1 dc in each of next 2 dc, ch 1, V St in next sc, ch 1,
1 dc in each of last 3 sts. Ch 3, turn.
Row 4- 1 dc in each of next 2 dc, ch 3, 1 sc in center of next V St, ch 3, *1 dc in each of next 2 dc, ch 3, 1 sc in next V St, ch 3, rep from * across, till you reach last 3 sts, 1 dc in each of last 3 sts. Ch 3, turn.
Row 5- 1 dc in each of next 2 dc, ch 3, 1 sc in next sc, ch 3, *1 dc in each of next 2 dc, ch 3, 1 sc in next sc, ch 3, rep from * across, till last 3 sts, 1 dc in each of last 3 sts. Ch 3, turn.
Row 6- Rep row 3. Ch 3, turn.
Row 7- Rep row 4. Ch 3, turn.
Row 8- Rep row 5.
Row 9- Rep row 3.
Row 10- 1 dc in each of next 2 dc, ch 1, 3 dc in next V St, ch 1, *1 dc in each of next 2 dc, ch 1, 3 dc in next V St, ch 1, rep from * across, till you reach the last 3 sts, 1 dc in each of the last 3 dc. Fasten off, weave in tail.


Right Side-
Join Cafe to opposite side of scarf.
Row 27- 1  tr in each tr across. (24 tr) Ch 4, turn.
Row 28- tr in each tr across. (24 tr) Ch 4, turn
Row 29- tr in each tr across. (24 tr) Ch 4, turn
Row 30- 1 tr in each tr across. (24 tr) Ch 3, turn.
Lace Edge-
Row 1- 1 dc in each of next 2 tr, ch 3, skip 2 tr, 1 sc in next tr, ch 3, skip 2 tr, 1 dc in each of next 2 tr, ch 3, skip 2 tr, 1 sc in next tr, ch 3, skip 2 tr, 1 dc in each of
next 2 tr, ch 3, skip 2 tr, 1 sc in next tr, ch 3, skip 2 tr, 2 dc in next tr, 1 dc in last st of row. Ch 3, turn.
Row 2- 1 dc in each of next 2 dc, ch 3, 1 sc in next sc, *ch 3, 1 dc in each of next 2 dc, ch 3, 1 sc in next sc, rep rill last 3 sts of row, 1 dc in each of last 3 dc. Ch 3, turn.
Row 3- 1 dc in each of next 2 dc, ch 1, 1 dc, ch 1, 1 dc (V St) in next sc, ch 1, 1 dc in each of next 2 dc, ch 1, V St in next sc, ch 1, 1 dc in each of next 2 dc, ch 1, V St in next sc, ch 1,
1 dc in each of last 3 sts. Ch 3, turn.
Row 4- 1 dc in each of next 2 dc, ch 3, 1 sc in center of next V St, ch 3, *1 dc in each of next 2 dc, ch 3, 1 sc in next V St, ch 3, rep from * across, till you reach last 3 sts, 1 dc in each of last 3 sts. Ch 3, turn.
Row 5- 1 dc in each of next 2 dc, ch 3, 1 sc in next sc, ch 3, *1 dc in each of next 2 dc, ch 3, 1 sc in next sc, ch 3, rep from * across, till last 3 sts, 1 dc in each of last 3 sts. Ch 3, turn.
Row 6- Rep row 3. Ch 3, turn.
Row 7- Rep row 4. Ch 3, turn.
Row 8- Rep row 5.
Row 9- Rep row 3.
Row 10- 1 dc in each of next 2 dc, ch 1, 3 dc in next V St, ch 1, *1 dc in each of next 2 dc, ch 1, 3 dc in next V St, ch 1, rep from * across, till you reach the last 3 sts, 1 dc in each of the last 3 dc. Fasten off, weave in tail.

Fasten off Cafe, weave in tail.
Done!


Pathlights. . .Worthwhile exploring!
Best Blog Tips